FBench Developer's Guide 2007
Guide for new FBench and plug-in developers (Version 1).
 Overview
This guide contains a reference for FBench developers.
It walks through the steps to get up and running with FBench and plug-in development, and
it explains the purpose of each package and highlights important classes
within them. It also gives an overview of two plug-ins and provides a guide for
plug-in developers to get started with development. This guide assumes that the
reader is more or less familiar with Function Blocks as well as Java software
development and terminology.
| General |
Prerequisites Getting Started GUI Components FBench API |
| Package Description |
fbench fbench.dom fbench.dom.events fbench.graph fbench.graph.model fbench.graph.popup fbench.table fbench.translate fbench.tree fbench.ui |
| Extending FBench |
Menus LibraryElementView XSLT Transformation Algorithm Language Translation Graph Elements Project plug-in Debug plug-in |
| Plug-in Development |
Overview Manifest Creating a plug-in project using Eclipse |
Prerequisites
TOPFBench is developed using Sun Java 6, and is being developed mainly on the Microsoft Windows platform. It may be possible to compile and run FBench on other platforms (such as Mac OS X or Linux) but this is not currently supported.
FBench uses the Swing library for GUI elements, and W3C.org for XML parsing (used to store Function Block models). It also currently uses the Function Block Runtime (FBRT) library which is provided.
-
JDK 1.6
The Sun Java SE Development Kit (JDK) is used to compile FBench, and can be downloaded freely from http://java.sun.com/javase/downloads/index.jsp
-
Java Development IDE
The standard IDE used by the FBench project is Eclipse version 3.3. Eclipse is a popular open source software that can be freely downloaded from the internet at http://www.eclipse.org/downloads/
-
SVN Client (Optional)
To get the latest source code from the SubVersion repository an SVN Client is required. A free client called TortoiseSVN can be downloaded from http://tortoisesvn.tigris.org/
A book on SubVersion can also be view
and download from
http://svnbook.red-bean.com/
FBench Core Concepts
- FBench is an application used to create and manipulate Function Block models which can then be executed on a Function Block Runtime. - Individual Function Blocks, Composite Blocks and Systems are stored as Library Elements in the FBench\src directory. Each element is an XML document and is stored in a directory according to their specified package. - Source code (typically Java) is generated on the fly as the user creates the model. - When the user chooses to compile the model, the source code and compiled classes are stored in FBench\rt\fb\rt - Typically, Systems are executed using FBRT.
Getting Started
TOP1. Make sure your development environment meets all of the Prerequisites. 2. Acquire the FBench source code If you do not have a copy of the source code, it can be downloaded from the SubVersion repository, otherwise you may skip this step.
Choose a location to store the source code (For example, "C:\Development\FBench"). If using TortoiseSVN, right-click on the new folder in Windows Explorer and choose "SVN Checkout..." from the context menu.
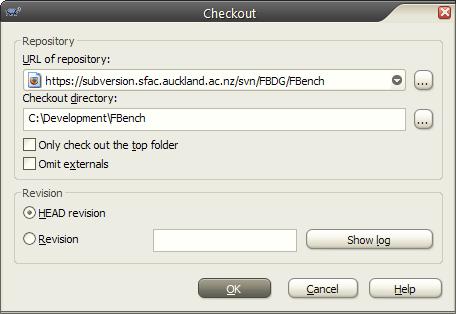
Input the SVN repository URL (currently 'https://subversion.sfac.auckland.ac.nz/svn/FBDG/FBench') and make sure the checkout directory is correct. Choose OK. When the download is complete you will have a full copy of the latest source code. For more information about using TortoiseSVN visit http://tortoisesvn.tigris.org/
3. Import the FBench project into Eclipse
(Note: If this is the first time you have run Eclipse since installing, you will need to choose a workspace location. This is the directory where all Eclipse projects will be stored).
Click the 'File' menu and choose 'Import...'. This will display a dialog similar to this:
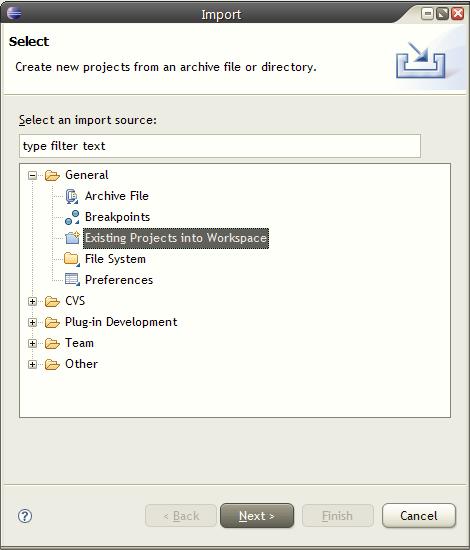
Choose the "General > Existing Projects into Workspace" option and click OK. Locate the directory where the FBench source code folder is stored (In this example, FBench is located in C:\Development\FBench), and select the FBench project.
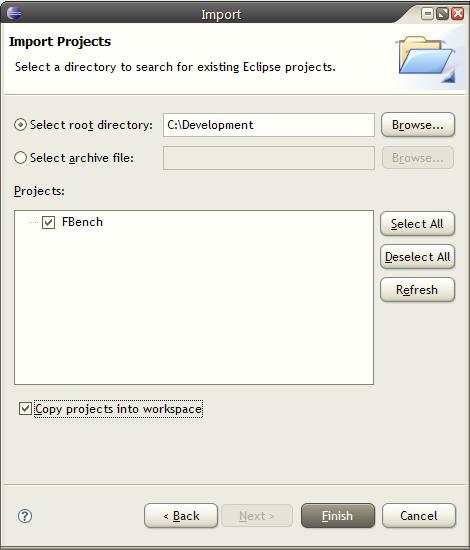 If you wish, select 'Copy projects into workspace' to copy all source code into your workspace directory.
Click 'Finish' to import the project into Eclipse.
4. Build and classpath settings
FBench requires the following entries in its classpath:
- 'fbrt.jar'
- 'jars/vv.jar'
- 'jars/checker.jar'
- 'jars/jdom.jar'
- 'jars/xercesImpl.jar' If you imported the project directly into Eclipse, these settings should already be correct, but you can access the Build path settings by right-clicking on the FBench project folder in the 'Package Explorer' pane within Eclipse, and choosing "Build path > Configure Build Path..."

5. Run settings
FBench can be launched by executing fbench.bat in the FBench root directory, but also directly from Eclipse. Choose "Open Run Dialog..." from the 'Run' menu.

- Double-click on "Java Application" in the left-most panel to create a new Run configuration.
- Give the configuration a name (eg. FBench) and input "fbench.FBench" as the Main class.
Click run to launch FBench.
GUI Components
TOP
This section points out some of the main GUI components and classes or packages that they are related to.
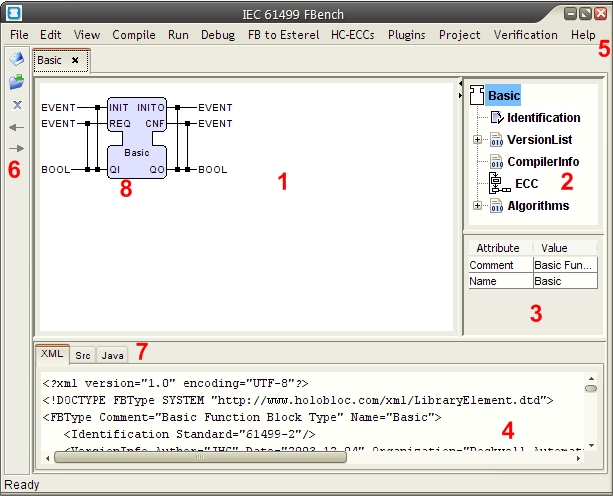 1. The current GraphView (fbench.graph package).
This panel visualizes the currently selected element and provides an interface for the user to directly interact with the model. When a user clicks a GUI Element an fbench.dom.events.ElementSelectionEvent is fired, which causes the current view to update. 2. The DOMTree (fbench.dom package).
This panel displays a tree for the structure of a model, and also fires fbench.dom.events.ElementSelectionEvent 's when a user clicks a tree node. 3. The attribute table (see fbench.table.ElementTableModel).
This table allows the user to edit element attributes. Whenever an element is changed a MutationEvent (see fbench.dom.events.MutationListener) is fired. 4. The XML pane (see fbench.dom.DOMTextModel).
This text area displays the XML for the current model. It is updated for every ElementSelection- or MutationEvent. 5. The main menu (created within fbench.FBench).
This is the main menu for the application. When a plug-in is loaded it may create menus which are accessed here. 6. The toolbar (created within fbench.FBench).
This provides access to common tools and commands, such as parsing XML, saving to disk etc. 7. Source code tabs (created within fbench.LibraryElementView ).
These tabs are used to store and present the source code generated by fbench.dom.DOMTranslationModel (on ElementSelectionEvent). 8. GraphElements (see fbench.graph package).
GraphElements extend javax.swing.JComponent and represent an element of the model. They handle visualisation and user interaction with that element.
Package Descriptions
fbench
TOPThe package fbench is the core package, and is the base of the application. The application entry point and main UI window is the fbench.FBench class, which holds all menus, toolbars and panels.
The Library static class is used load and save files. Documents are cached internally by their name. Library can return the path used to load a document.
Compiler is used to compile individual Java source files.
LibraryElementView is the base panel used to edit a function block model (LibraryElement), and instances are kept in individual tabs by the main window. LibraryElementView creates sub-panels used to navigate the graphical and textual views of a LibraryElement.
The package also supplies utility classes such as file filters, directory lists, XML parsers etc.
fbench.dom
TOPThis package supplies classes used in translating the XML DOM into other textual forms.
DOMTextModel presents the XML document and refreshes changes to the model automatically. It is held in a tabbed pane with textual displays of all source code generated by the XSL compiler.
DOMTranslationModel is used to transform the DOM using an XSL style sheet and invoke translation of algorithms into the target language if needed.
fbench.dom.events
TOPThis package provides events that are fired when the user interacts with the DOM. The most used events are ElementSelectionEvent (fired when the user clicks on an element) and MutationEvents.
Mutations are events that are fired when the user modifies an element and are specific to the current view. To add a new mutation event simply extend the MutationListener class and override the needed methods (eg. processNameChange()).
fbench.graph
TOPThis package contains components representing the elements of a model. The GraphElements are named according to the element they draw, and must handle all drawing and mouse interaction.
GraphView is an abstract panel used to display the graph.
fbench.graph.model
TOPGraphModels are collections of GraphElements, and are used to display directed graphs such as FBNetworks and ECC’s. To locate the GraphElement used to render a node use forElement().
fbench.graph.popup
TOPThis package contains classes used to display popup dialogs to the user. Dialogs extend DialogModel and are invoked from ContextMenu.
fbench.plugin
TOPClasses for plug-in management. PluginManager is used to locate, validate, load and create menus for plug-ins. Plug-ins are identified at FBench startup.
fbench.table
TOPElementTableModel is used to display the attributes of an element in an editable, tabular form. The table updates itself automatically and fires mutation events as the user edits data.
fbench.translate
TOPClasses used to translate algorithms before XSL transformation. A translator implementing the Translator interface returns a ParseResult, containing the resulting source code and any errors and warnings that were generated. Translators are stored in the TranslatorSource.
fbench.tree
TOPA DOMTree is a tree of DOMTreeNodes that represent the structure of a LibraryElement. Nodes are named according to the element they represent, and may control the name, icon and children DOMTreeNodes of that element.
fbench.ui
TOPThis package contains user interface extensions for the FBench UI.
Extending FBench
LibraryElementView
TOPLibraryElementView is the main interface for navigating an IEC61499 LibraryElement. To add a tab to the lower tabbed pane use addTab(), The view’s document, XML or source code text, GraphView and DOMTree can be accessed using getter methods. The view can either be extended or replaced with a new panel type, and any views need to be instantiated from FBench.
XSLT Transformation
TOPXSL sheets are used to translate the XML document into text. This text is usually source code, but can be any other desired textual representation of the LibraryElement. To add a new XSL sheet create a new fbench.dom.DOMTranslationModel, and add a new tab to the fbench.LibraryElementView.
Algorithm Language Translation
TOPXSL sheets are used to translate the XML document into text. This text is usually source code, but can be any other desired textual representation of the LibraryElement. To add a new XSL sheet create a new fbench.dom.DOMTranslationModel, and add a new tab to the fbench.LibraryElementView.
Graph Elements
TOPTo modify the appearance of an element of a Function Block model, locate the corresponding class in the fbench.graph package. To add a new element create a class in the fbench.graph package that extends GraphElement.
Project Plug-in
TOPThe project plug-in provides support for dependency tree generation, export\import and batch compiler. It uses FBXMLParser to parse a document into its own format and generate a dependency tree. A Project is used to encapsulate a high-level LibraryElement and its dependencies, and provides methods to load and save projects (may use JAR compression). ProjectBuilder uses a dependency tree to build and compile source code.
Debug Plug-in
TOPThe debug plug-in provides debugging and visualisation support for executing applications. Blocks are displayed using DebugElementView, and systems use DebugSystemView. Trace data is dispatched by the DebugServer, which handles incoming TCP connections. DebugManager handles the creation of internal frames in the debugging window.
Plug-in Management Plug-in
TOPThe management plug-in lists available plug-ins that were found in the Plugins directory. ListPlugin is the main class.
Plug-in Developer's Guide
Overview
TOPIn FBench a plug-in is used to extend the functionality of the main application,and plug-ins can be open source or proprietary. A plug-in can be any composed of number of Java classes, and are hooked into FBench using a special manifest file.
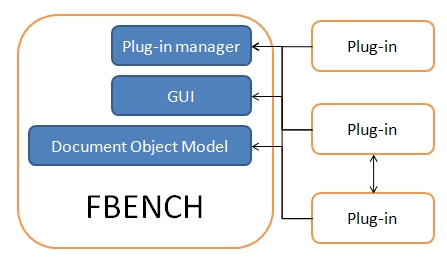
Plug-ins are able to access the FBench GUI as well as the underlying XML Document Object Model (DOM) and compilation and translation frameworks. To create a plug-in for FBench simply create a class with a name ending in PlugIn, and place it in the FBench/Plugins directory. Plug-ins can have any number of classes and files, and it is useful to place it in its own sub-directory.
Manifest
TOPNext, create an XML document called FBPluginItem.xml and place it with the plug-in class. This is the plug-in manifest and will provide information to FBench about the plug-in. The manifest must have a root element call FBPlugin with the following attributes:
| Name | The name of the plug-in. |
| Author | The author of the plug-in. |
| SchemaVersion | The version of manifest schema to use. Currently the only supported version is 1.0 |
| Copyright | Plug-in copyright information. |
| Description (optional) | A description of the plug-in. |
| xmlns:xsi | Informs the XML parser that schema validation is used (typically http://www.w3.org/2001/XMLSchema-instance). |
| xsi:noNamespaceSchemaLocation | The path to the manifest schema (typically "..\PluginSchema.xsd"). |
The FBPlugin element may have any number of Class elements, which list the class files that are used by the plug-in. This allows FBench to check whether all class files are present before trying to load the plug-in in order to prevent errors. A Class element has the attribute "QualifiedName" which defines the full name of the class.
The root element must have a MenuHeirarchy element (this can be empty, however) which contains any number of Menu elements. This designed to provide the necessary information for FBench to construct a menu automatically for the plug-in. Menu elements have the following attributes:
| Label | The label of the menu, as it appears in the GUI. |
| Icon (optional) | The path to the icon displayed with the menu. |
| Tooltip (optional) | Tooltip text to display when mouse over. |
| MenuListener (optional) | The listener class to use (typically fbench.FBench). |
| ActionCommand (optional) | The method to execute when the menu is clicked (e.g. MyPlugin.refreshMenu). |
Menu elements contain any number of Menu, MenuItem, CheckBox and RadioButton elements. These elements have the same elements as the Menu element, except for CheckBox and RadioButton, which have a ‘Selection’ attribute, which defines the default state of the item and has the value "true" or "false".
An example manifest:
            <?xml encoding="UTF-8" version="1.0" ?>

                <fbplugin author="William Dai and Arthur Shin (UoA)" copyright="University of Auckland"
                name="Debug Manager" pluginversion="1.0" schemaversion="1.0" xmlns:xsi="http://www.w3.org/2001/XMLSchema-instance"
                xsi:nonamespaceschemalocation="..\PluginSchema.xsd">

                  <menuhierarchy>

                    <menu actioncommand="DebugPlugIn.refreshDebugMenu" label="Debug" menulistener="fbench.FBench">


                <menuitem actioncommand="DebugPlugIn.debug" actionlistener="fbench.FBench" icon="debug16"
                    label="Start Remote Real-time Debugging" />


                <menuitem actioncommand="DebugPlugIn.debugPB" actionlistener="fbench.FBench" icon="debug16"
                    label="Start Play-back debugging">

                    </menu>

                  </menuhierarchy>


                </fbplugin>
ActionCommand methods must only take a java.util.Vector parameter, and is usually defined static. The vector object will contain the following objects:
[0] – The menu/item instance that was clicked on.
[1] – The instance of FBench.
The panel used to navigate a LibraryElement is called fbench.LibraryElementView, and can be retrieved using the method FBench.getSelectedView().
It provides support for adding tabs to the lower tabbed pane (addTab()), retrieving the XML text (getXmlArea()), Java source (getJavaArea()), the current GraphView object – which is used to display a graphical representation of the model (getGraphView()) and the current file (getFileName()).
Creating a plug-in project using Eclipse
TOP
This section will walk through creating an FBench plug-in project using the Eclipse IDE. This guide assumes that the user has a FBench source code project already set up in Eclipse (see Getting Started). 1. Create a new project
In Eclipse, click the "File" menu, select "New > Java Project".

Give the project a name and click "Finish". This will create a new project visible on the Eclipse package explorer. 2. Setting up the project
Eclipse doesn't allow us to create a project in the FBench\Plugins folder directly if FBench is in the Eclipse workspace. To get around this fact we need to copy our new project to the new location ourselves, then add it back into Eclipse.
- Move [Workspace Directory]\MyFBenchPlugin to [Workspace Directory]\FBench\Plugins (assuming FBench is in your Eclipse workspace).
The directory structure should be [Workspace Directory]\FBench\Plugins\MyFBenchPlugIn. - Remove the project from the package explorer by right-clicking on the project and choosing Delete. - Import it again in a similar manner to the FBench project (File > Import, then select [Workspace Directory]\FBench\Plugins\MyFBenchPlugIn). (see Getting Started for a more thorough example). To add the FBench project to the plug-in's build path, right-click on the project in the package explorer and choose Build Path > Configure Build Path...

Choose "Add" and select FBench. This will allow you to reference FBench classes in you plug-in project. (see the FBench API for more information). Lastly, we will set the output folder to be simply the project folder:

3. Creating plug-in classes
Create a new class ("File > New > Class") and call it "MyFBenchPlugIn". the "-PlugIn" suffix tells FBench to instantiate the plugin automatically. This isn't necessary per-se, but is typical behaviour of an FBench plug-in.
Write, or copy & paste the following code into the source file:
			import java.util.Vector;


			public class MyFBenchPlugIn {

			  public void refreshMenu(Vector v){

			    System.out.println("Hello, world! This is my new FBench plug-in.");

			  }

			}
Click "File > New > File", and call the new file "FBPluginItem.xml". This is the manifest file for the new plug-in and it always has this name. It is an XML document that specifies information about the plug-in and its menu structure.
Write, or copy & paste the following code into FBPluginItem.xml:
			<?xml version="1.0" encoding="UTF-8"?>

			<FBPlugin Name="MyFBenchPlugIn" Author="Me" PluginVersion="1" SchemaVersion="1.0" Copyright="Me" xmlns:xsi="http://www.w3.org/2001/XMLSchema-instance" xsi:noNamespaceSchemaLocation="..\PluginSchema.xsd">

			 <MenuHierarchy>

			  <Menu Label="My Plug-in" MenuListener="fbench.FBench" ActionCommand="MyFBenchPlugIn.refreshMenu"/>

			 </MenuHierarchy>

			</FBPlugin>
This will create a new menu with the label 'My Plug-in', which calls 'MyFBenchPlugIn.refreshMenu' when clicked.'fbench.FBench' is the typcial menu listener and will handle clicks by invoking a method with the following declaration: void methodName(Vector v){ } For an explanation of the manifest contents see the section Manifest above. 5. Loading the plug-in
Your project should look similar to this:

Both files are in the project's root directory (eg, the manifest is located at [FBench]\Plugins\MyFBenchPlugIn\FBPluginItem.xml). Eclipse usually builds the project automatically and any errors will be visible in the Problems pane in Eclipse.
Run FBench using the Run command (see Getting Started) and you should see in the Console pane the following text: MyFBenchPlugIn resides in class MyFBenchPlugIn which indicates that FBench has successfully loaded the plug-in. 6. Accessing the plug-in
Finally, you should notice the new menu item in FBench called "My plug-in".
 When you click on it, you will see a message appear in the console.
