Preface Back to top
a. Community
OOONEIDA FBench is an open source project and is developed by the community through the FBench project hosted in SourceForge.net. Those who have willingness and interest to improve FBench are welcomed to participate.
Official Project Webpage: http://oooneida-fbench.sourceforge.net/
SourceForge.net FBench Thread: http://sourceforge.net/projects/oooneida-fbench/
FBench Wiki: http://fbench.wikispaces.com/
b. License
FBench is developed and released under agreement of the Common Public License (CPL) version 1. You can find more about the license from http://www.opensource.org/licenses/cpl1.0.php
c. Acknowledgements
| Dr. James H. Christensen | |
| For initiating the Workbench project, which is the foundation of FBench, and releasing as an open source project | |
| Dr. Valeriy Vyatkin | |
| For founding and supervising the FBench project | |
| Mr. Cheng Pang | |
| For managing the project with enthusiasm | |
1. Introduction Back to top
a. The FBench
FBench is an open-source development platform for embedded automation systems and their components based on Function Block IEC61499 Standard. You can design and implement various types of function blocks and their networks using graphical components.
The function blocks and network of function blocks are stored in XML files. When loading the files their structures are compared against given schema files to avoid problems caused by having inappropriate structure of the XML file.
The function block files need to be translated and compiled into a target language that the runtime environment is written; currently FBench uses Java, which means XML files are translated into Java and compiled into class files to be executed by the current java based runtime, Function Block Runtime.
However, regardless of types of runtime, algorithms for function blocks can be written in many different languages if the translators for the languages are provided. The translators can be added through the Algorithm Translation Framework – see Developer’s Guide for details.
FBench can be easily deployed and executed in different machines without any installation if the machine supports Java Standard Edition version 1.6 or above.
b. History of FBench
The foundation of FBench is Workbench, which was also an open-source project. Workbench was originally developed and distributed by the developer of "Function Block Development Kit (FBDK)" and it can be found on SourceForge.net - Oooneida-Workbench.
FBench has been developed since 2006 by the Function Block Development Group of University of Auckland under guidance of Dr. Valeriy Vyatkin.
| Year | Implementation | Contributors |
| 2006 |
|
|
| Dec 2006 ~ Mar 2007 |
|
|
| 2007 |
|
|
c. Installing FBench
i. System Requirements
FBench is a pure Java-based program developed with Java Development Kit 1.6 in Windows. Any machine with Java Standard Edition (SE) 1.6 or above should be able to run FBench. The current version of FBench has been tested in Windows XP (SP2), Windows Vista, and Linux (Ubuntu).
ii. Installation
FBench is normally distributed as a single zip archive file. Installation of FBench only requires extracting the archive file, which can be unzipped to any destination folder, but the folder structure must be preserved. The following diagram shows the default folder structure inside the archive file:
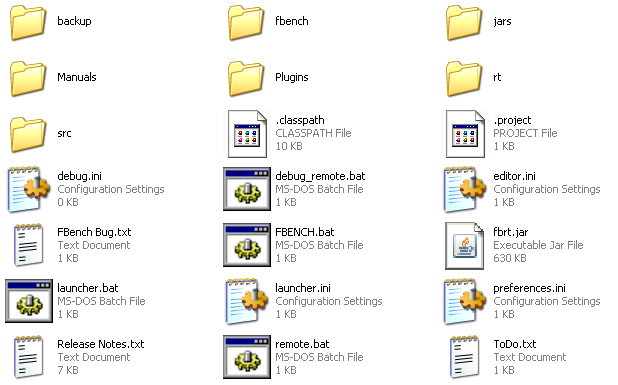
Depending on your particular machine and OS settings, before running FBench the contents of following ini files should be changed accordingly:
editor.ini
| Parameter Name | Explanation | Default |
| browser | The command to run the Web browser for help files. | \\Program Files\\Mozilla Firefox\\firefox |
| java | The command to run the Java™ Runtime Environment (JRE) executable. | java |
| javac | The command to execute the Java compiler. | \\Program Files\\Java\\jdk1.5.0_06\\bin\\javac |
| timeout | The initial timeout period for management commands to remote devices. | t#2s |
preference.ini
This file consists of a line of code that gets called and executed upon compiling function block files inside FBench. It accepts general parameters used for javac after location of javac file.
| Parameter Name | Explanation |
| javac | The command to execute the Java Compiler. |
Usage:
javac (full path to javac file) (parameters)
FBench provides a code as shown below as default:
javac C:\\Program Files\\Java\\jdk1.6.0\\bin\\javac -classpath ./jars/fbrt.jar;
launcher.ini
bounds 100,100,150,200
debug.ini
This file stores address of debug server host and its port used for the communication.
| Parameter Name | Explanation | Default |
| host | Address of debug server host. | localhost |
| port | Value of Port used for communication. | 61502 |
Sample Setting files:
Windows
editor.ini
javac C:\\Program Files\\Java\\jdk1.6.0\\bin\\javac
preferences.ini
javac C:\\Program Files\\Java\\jdk1.6.0\\bin\\javac -classpath ./jars/fbrt.jar;
launcher.ini
bounds 100,100,150,200
debug.ini
Empty
Linux
Similar to Windows except that replace the path separator and path conform to Linux format.
III. Launching FBench
Windows:
To launch FBench on Windows OS, double clicking on FBENCH.BAT file is all you need to do.
It is a simple batch file which invokes java to execute FBench.class file that is located under fbench folder.
When it launches FBench, it looks up through list of destinations that were given as classpath variables. Ones that appear first will override classes with same name that appear in other classpaths.
Linux:
Coming soon.
2. Basic Concepts Back to top
a. Starting FBench
1. Launch FBench.
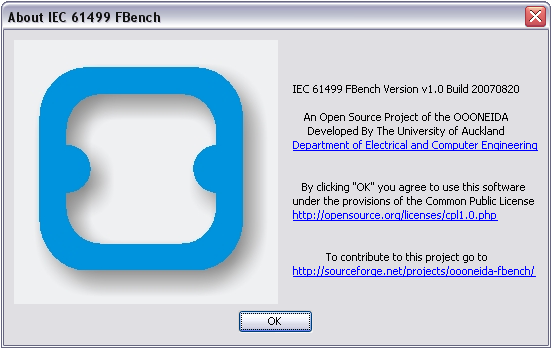
2. An About dialog will prompt out. By clicking the “OK” button, you agree to use the software under provisions of the Common Public License. FBench will soon initiate after clicking the button.
b. Layout of Graphical User Interface
FBench consists of several sections of GUI components.
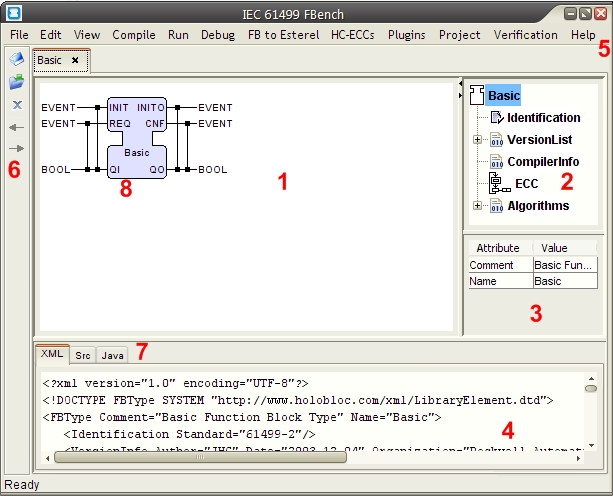
1. The current GraphView
This panel visualizes the currently selected element and provides an interface for the user to directly interact with the model.
2. The DOMTree
This panel displays a tree for the structure of a model. 3. The attribute table
This table allows the user to edit element attributes. 4. The XML pane
This text area displays the XML for the current model. 5. The main menu
This is the main menu for the application. 6. The toolbar
This provides access to common tools and commands, such as parsing XML, saving to disk etc. 7. Source code tabs
These tabs are used to store and present the source code generated. Users may directly input code here and reflect changes to the current model.
8. GraphElements
GraphElements represent an element of the model.
c. Create Function Block
1. To create a function block, choose a type of function block from File -> New in the menu.
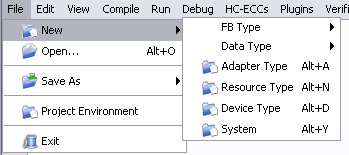
2. The new function block consists of the minimal information to form a structure.
d. Save
1. If you want to rename the function block, select the top component on the structure tree. Change value for the "Name" attribute.
2. To set destination location where the file will be saved, click onto "CompilerInfo" from the tree view. A word that comes after "Package fb.rt." is the folder that the function block file will be stored inside the source folder.
3. Select File > Save As > XML from the menu, or press Alt key and X key together.
e. Open
1. Select "Open" from the menu.
2. Browse through the item selection view and choose a file to be loaded onto FBench.
3. Components of the selected function block will be displayed, both graphically and textually, on the FBench window.
f. View File Tree of Source Folder
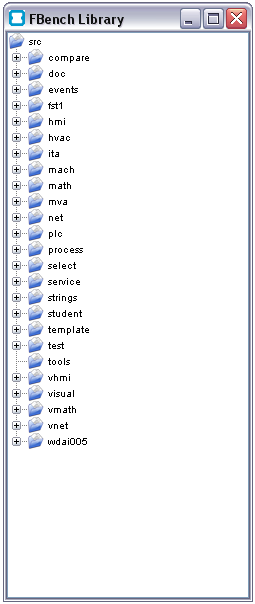
Select View > Display Library Tree Window from the menu.
A window consisting of all compatible files that reside under Source folder will be displayed. Files can be loaded directly from the window.
3. Function Block Development Back to top
Each and every component of the function block can be created, removed and removed either graphically or textually. By editing the XML code manually and selecting "Parse" icon that locates in the left bar, the changes will be reflected on FBench. However, this cannot guarantee the reliability of the code so it is not recommended to take this step.
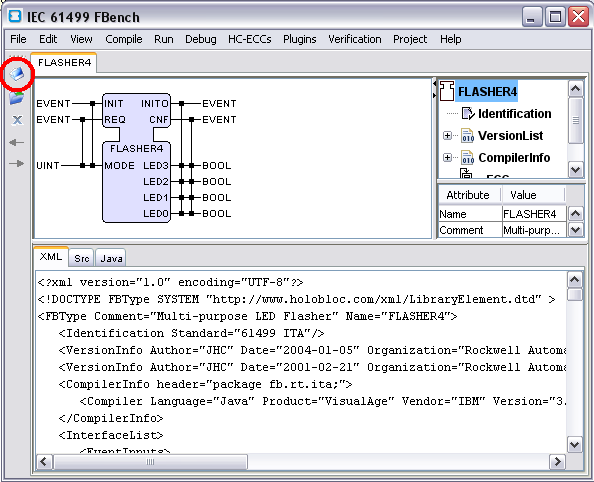
Items provided below are guide to create, modify and remove components using GUI provided by FBench.
a. General
Changing name of function block
1. Select the top element of function block tree view.
2. Modify name in the table.

Adding algorithm (Only applicable to Basic Function Blocks)
1. Right click on "Algorithms" in Tree view
2. Select "Add Algorithms"
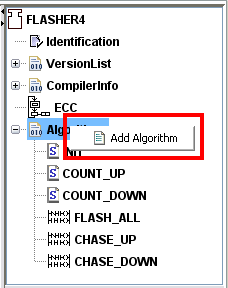
3. Insert name of the algorithm and its language
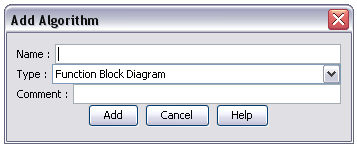
4. Click on "Add" button to confirm your decision.
b. Function block interface
Event
Adding an event
1. Right click on the white space in the same panel as the function block diagram resides in.
2. Select type of event from the context menu.
3. Insert name and comment, and then assign association with variables if required by ticking the checkboxes.
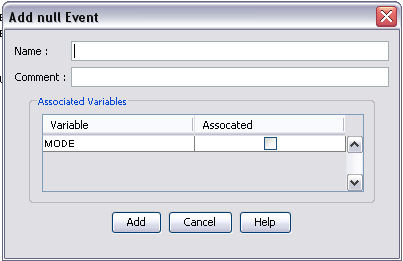
4. Click on "Add" button to add the event to the function block interface.
Modifying an event
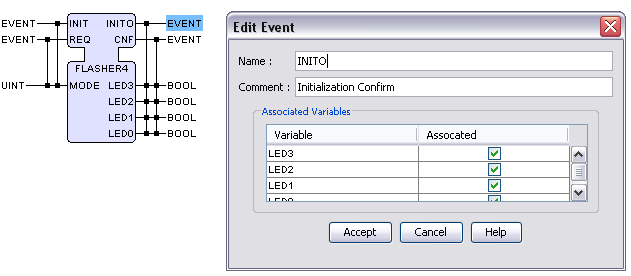
1. Either right click or double click on a target event.
If you right clicked on the event, select "Edit" from the context menu.
2. Modify values or associations.
3. Click on "Accept" button to reflect modifications
Removing an event
1. Right click on a target event.
2. Click on "Delete" item from the context menu.
3. Click on "Accept" button on a pop-up to confirm your decision.
Variables
Adding a variable
1. Right click on the white space in the same panel as the function block diagram resides in.
2. Select type of variable to be added.
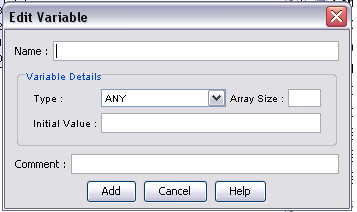
3. Enter name of the variable and other attributes if they are required.
4. Click on "Add" button to add the variable for the function block.
Modifying a variable
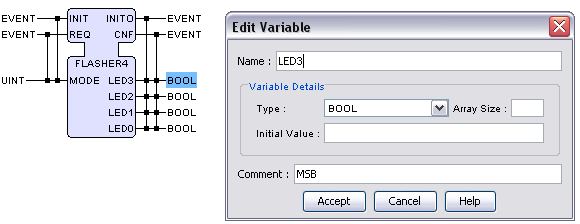
1. Either right click or double click on a target variable.
If you right clicked on the variable, select "Edit" from context menu.
2. Modify values.
3. Click on "Accept" button to reflect modifications.
Removing a variable
1. Right click on a target variable.
2. Click on "Delete" item from the context menu.
3. Click on "Yes" on a pop-up to confirm your decision.
c. Execution Control Chart (ECC)
Every state and connections can be dragged within the ECC, or its co-ordination can be inserted through the Attribute/Value table that locates below the Tree view.
Execution Control State (ECState)
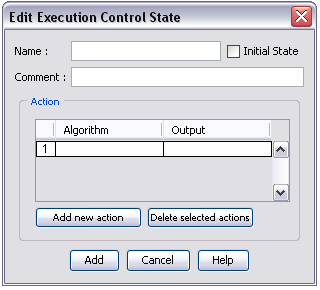
Adding a state
1. Right click on the white space of ECC.
2. Select "Add State" from the context menu.
3. Provide name of the state and other information for the state.
4. Click on "Add" to confirm your decision.
Modifying a state
1. Either right click or double click on a target state.
If you right clicked on the state, select "Edit State" from the context menu.
2. Modify information about the state.
3. Click "Apply" to reflect the changes to the state.
Removing a state
1. Right click on the state.
2. Select "Delete" from the context menu.
3. Click on "Yes" to confirm your decision on deletion.
Execution Control Transition (ECTransition)
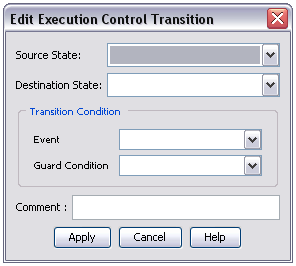
Adding a transition
1. Right click on the white space on ECC.
2. Choose source and destination ECState.
Note: Previous two steps can be shortcut by right click dragging from one state to another
3. Assign event and/or guard condition. Note: Guard condition can be typed in manually.
4. Select "Apply" to confirm the decision.
Modifying a transition
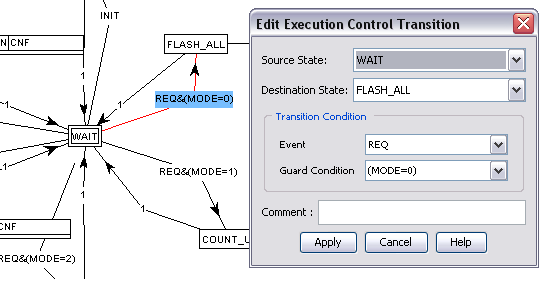
1. Either right click or double click on the connection to be modified.
If you right clicked on the connection, select "Edit" from the context menu.
2. Modify values.
3. Select "Apply" to reflect the changes to the connection.
Removing a transition
1. Right click on the connection.
2. Select "Delete" from context menu.
3. Select "Yes" to confirm the deletion.
d. Function Block Network (FBNetwork)
Function Block
A function block can be loaded by double clicking on the function block type label that locates in the middle of the function block.
Adding a function block
1. Right click on white space of the FBNetwork panel.
2. Select "Add Function Block" from the context menu.

3. Provide name of the function block and select the load icon.
4. Select the type of function block to be inserted.
5. Adding comment is optional.
6. Click "Add" button to confirm your decision.
Modifying a function block
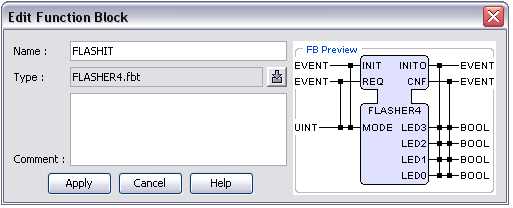
1. Either right click or double click on the name of the function block.
If you right clicked on the function block, select "Edit" from the context menu.
2. Modify information about the function block.
3. Select "Apply" to reflect the changes.
Removing a function block
1. Right click on name of the function block.
2. Select "Delete" from the context menu.
3. Select "Yes" to confirm.
Connection
Adding a connection
1. Right click on a blank area of FBNetwork.
2. Select "Add Connection".
3. Select the connection type, source and destination.
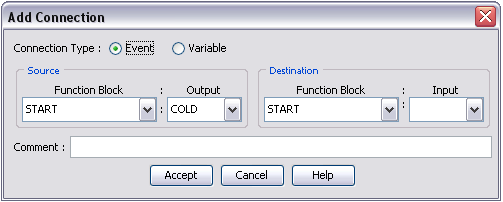
4. Select "Accept" to confirm your decision.
Modifying a connection
1. Either right click or double click on the connection.
2. If you right-clicked on the connection, select "Edit" from the context menu.
3. Modify values.
4. Select "Accept" to reflect the changes.
Removing a connection
1. Right click on the connection.
2. Select "Delete" from the context menu.
3. Select "Yes" on the pop-up to confirm your decision.
4. Launching Function Block Back to top
a. Compilation
i. Single File Compilation
1. Select CompilerInfo from the tree view.
2. Check the target package folder from "Header".
3. Select Compile to Java from Compile Menu.
Note: The path to Java compiler (i.e. java.exe) need to be specified in Editor.ini file.
Instruction can be found from Installation
ii. Build System
1. Open up a file.
2. Make sure the compiler was properly set in the Editor.ini file.
3. Select Build System from Project menu.
b. Launch
1. Compile current file and its sub-files if they exist.
2. If compilation was successful, select Launch from Run > Launch from the menu.
FAQ
To be added.
Meanwhile, please post your questions on our forum (http://sourceforge.net/projects/oooneida-fbench/)
Contact
Project Organiser
Project Manager
Software Developers